
Set up and schedule Emails to export your Google Sheets data automatically on a recurring basis. Convert your sheets to PDF, XLS, ODS or CSV files. Send them to one or more recipients. Optionally save them to Google Drive too.
In this tutorial I explain how the Schedule & Send Email Add-On works, which features are available and how you can benefit from it.
Quick Overview:
Your advantages with this add-on:
- Automate an never ending and boring task: Sending recurring emails manually.
- Simplify your work: Let the plugin do the repetitive work.
- Reduce making mistakes: The add-on never forget to send your emails.
- Save your time: Once setup, don't think about it anymore.
Further resources:
Let's start how you get the add-on:
GSuite Marketplace: Get the Add-On for free
The Schedule & Send Email Plugin is available for Google Sheets via the GSuite Marketplace:

Hint: The Schedule & Send Email add-on is free!
Second possibility: You can find and install the Add-On also via any Google Sheets document. To do so, open any Google Sheets and go in the menue to Add-Ons --> Get Add-Ons:

Your First Steps
After installing, the plugin it is available via any Google Sheets document.
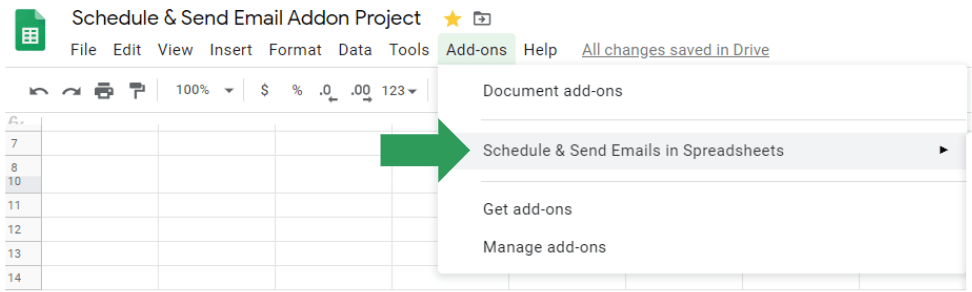
Open a desired sheet and go in the sheets menue to Add-Ons --> Schedule & Send Emails in Google Spreadsheets:


It already contains your first schedule configuration called "New Schedule".
Note: The ⛔-icon indicates that the schedule is not yet active. Once enabled the icon changes to ✅.
Now you can start set up your schedule.
To do so click the blue "Edit" button. You will be forwarded to the setting details:

- WHICH sheets you want to export: Via the export settings.
- TO WHOM you want to sent your sheets (one or many): Via the email settings.
- WHEN you want to sent your mails (one time, hourly, daily, weekly, monthly, yearly): Via the schedule settings.
Lets start with the export settings:
Schedule&Send Mails: Export Settings
With the export settings you can define which of your sheets you want to send automatically to your recipients.
To do so click on "Edit Export Settings" in the overview:


- On the left side you find the export setting configurations.
- On the right side you can choose which sheets you want to attach in your emails.
Choose File Format
First, choose in which format you want to send your files:
- PDF Document (.PDF),
- Microsoft Excel (.XLS),
- Open Document Spreadsheet (.ODS) or
- Comma Seperated Values (.CSV)
Note: The format selected applies to all files.
For PDFs you can use all settings available within Googles API like
- paper size,
- paper layout,
- scale,
- margin,
- page numbers,
- different formatting as well as
- header & footer settings.
Also decide if you want to export each file individually or merge them together to one file attachment.
Choose Sheets
Next choose the sheets you want to attach in your emails:
- one
- several
- the entire spreadsheet
- a selected range of cells inside a sheet
Hint: Hidden sheets are shown as well!
Please note: Google only allows to send a maximum of 5 sheets per email. Additional files will be sent empty or broken. >> See Google limits.
You can work around this limit by using the File Merger:
Optional: Add a Custom Cell Range
Sometimes you don't want to sent an entire sheet but only a range of cells like from A1:F50.
You can do that via the Custom Cell Range Feature:

Hint: Hover over the blue [?] to get more information about a special feature.
Optional: Merge Files
With the File Merger you can merge all your sheets to one e.g. PDF file - instead of sending X single sheets:

Note: The Fiel Merger is available for all file formats.
The File Merger is available in the PRO version of the Add-on (more infos here):


Imagine you get plenty emails a day all with attached Sheet1-filenames. You will get sick of it!
Whereas your recipients filenames like "Daily Ecommerce Report". People know exactly what to expect from your email attachment.
Optional: Use Dynamic Date Value in Filenames
BUT it's even better to include important information like the proper date to your filenames like "Daily Ecommerce Report 12_03_2020":

To do this, use the "current date" button to include {%Date%} in your filenames which automatically transforms the current date in your attachments:

For example: If you want to get the date from yesterday change the date variable to: {%Date-1%}
Dynamic date values for filenames are available in the PRO version of the Add-on:

Optional: Use Dynamic Cell Value in Filenames
Moreover use the „Cell Value“ button to use the value of ANY CELL in your spreadsheet and insert it to the filename:

After clicking on the "cell value" button the {%'Sheet1'!A3%} variable is included to the filename which transforms to the following filename: Company A Ecommerce Report.
The awesome thing about this feature is the dynamic usage: If cell A3 dynamically change daily, your filename automatically change daily too.
Dynamic date values for filenames are available in the PRO version of the Add-on:
Get a File Preview
After the configuration you can click on the „Preview“ button next to each file to get a preview of your file.
A new browser tab opens and you can see what your recipients will get when you sent them your files.
Save and go on
Finally, save your settings.
You now get a summary about your report configuration in the overview:

Another advantage: Your sheets get automatically refreshed before sending. This is important for formulas and filters within the sheets.
Now go further with the email settings:
Schedule&Send Emails: Email Settings
With the email settings you can define to whom you send your files.
To do so click on "Edit Email Settings" in the overview:


Setup Mail
You can now fill out the typical email fields like
- To,
- CC,
- BCC,
- subject and
- body
Note: To send the email to several recipients simply add several email addresses in the designated text field and separate them via a commas.
Moreover you have the following advanced features available:
Optional: Dynamic Cell Values in Mail Settings
Like in the export settings you can include dynamic date values like the current or yesterdays date or any other dynamic cell value into your email fields .
Note: Dynamic Values are available for subject and body as well as for To, CC and BCC fields.
To do this, use the „current date“ button to automatically include the current date: {%Date%}
Also use the "cell value" button to automatically include the value from the current cursor of your current sheet: {%’Sheet1′!A3%}

Let me show you in detail what you can do with dynamic values:
Use Case 1: Dynamic Recipients
You can dynamically send your emails to different people.
Note: Dynamic cell values can be added in the TO, CC and BCC fields.
For example: Send your emails to people stored in cell A3 which you get automatically from another sheet or any external data source.
Also BCC it to people stored in cell A4:

Then click in the appropriate email field like TO, CC or BCC.
Now click the "Cell value" button.
This includes the following template into your email field: {%'Sheet1'!A3%}
Your emails will now automatically send to all the people in cell A3 in Sheet1.
Note: To send your sheets to several recipients simply separate them with commas.
Use Case 2: Dynamic Subject
You can also add important information dynamically to the subject of your email.
For example: Add the name of the campaign you are reporting for directly in the subject line to tell your recipients exactly what the report is about.
Another example: Add the most important KPI e.g. the conversion rate in the subject to show the importance of the email.
Or simply add the date of the report:

Use Case 3: Dynamic Body
You can even add a short summary to the email body, extracting dynamically the most important information of your attachment and write it to the email body:

You can also add a entire cell range to your email body:
Optional: Dynamic Cell Range
To include a whole cell range, simply select a range in your sheet (you can select it, even while the email settings are open!) and click "Cell Range". This will create a new table in your email body including all selected cells:

Attention: Google Limits
Unfortunately Google has some strict quotas and limits for Sheet addons.
Two of them applies to your email settings:
- max. 50 recipients per email
- max. 100 emails per day
1. Max. 50 recipients per email: You are allowed to only send emails to a maximum of 50 recipients at once. Group emails will NOT count as single email address but for each person within the group.
Hint: If you want to send emails to more than 50 recipients you need an email provider which distributes the messages itself.
2. Max. 100 emails per day: In addition you can send max.100 emails per day.
Optional: Save to Google Drive
Please note: This is a BETA-feature and will be optimized in future. If you have any hints or needs please let me know.
Optionally you can save your email attachments to Google Drive too.
To do so, select the "Save to Google Drive" checkbox and select the folder where you want to store your files:

Your files get now automatically stored in Google Drive too.
Please note: You can't save your files to Google Drive without scheduling your reports because you need to specify when the saving should happen.
Hint: I use this feature for documentation reasons. Whenever I need to have a quick look on reported data in the past, I go to Google Drive and look the appropriate report up.
Save and go on
Finally, save your settings.
You now get a summary about your report configuration in the overview: ????
Send Email Now
You can now send your sheet(s) manually to your recipients via the blue "Send Email Now" button:

This is extremly helpful if you want to test your setup and send an email to you, before you start sending it to e.g. your boss, clients or colleagues.
It is also helpful when you often need to send Spreadsheet data manually but don’t want to export your files and attach it to your email each time.
Just use the blue “Send Email Now” button to manually send emails directly from Google Sheets to your recipients.
Next to the manual email sending, set up a schedule for reporting automation:
Schedule&Send Emails: Schedule Settings
With the report settings you can define when you want to sent your sheets.
To do so click on „Edit Schedule Settings“ in the overview:


Now you can create one of the following schedules:
- One time (doesn't reapeat)
- Hourly
- Daily
- Weekly
- Monthly
- Yearly
One Time Schedule
With the "one time" schedule you can plan your schedule for a specific date in future for example for April 8th 2020 between 8am and 9am in the morning:

This schedule will only sent once.
It doesn't repeat.
Hourly Schedule
With the hourly schedule your schedules will be send each hour on every day:

As a more advanced option, you can instruct the schedule to send your emails every second, third, fourth, etc. hour with the "Repeat every" setting: In this case your emails will not sent each hour but for example every second hour.
This advanced schedule configuration is available in the PRO version of the Add-on:


With this you can instruct your hourly schedule for example
- to start tomorrow at 6pm and end after 13 occurences.
- to start next week at midnight and end on June 13th 2021.
- to start next month at 9am and never end.
This advanced schedule configuration is available in the PRO version of the Add-on:


With the daily schedule your emails get sent once a day on a specific time.
Please note: Unfortunately it is not possible to have smaller time frames for sending daily emails because Google didn’t allow that (Google Limit). Instead it is possible to choose a specific hour of the day like from 2am to 3am or from 4am to 5am. Your emails will be sent in this time frame.
As a more advanced option, you can instruct the schedule to send your emails every second (bi-daily), third, fourth, etc. day with the "Repeat every" setting.
You can also select a start and end date for your daily schedules.
Please note: The repeat as well as start and end date setting is only available in the PRO version of the add-on.
Twice A Day Schedule
The daily schedule is also useful if you need to send your sheets several times a day like in the morning and in the evening:

Note: There is no "twice a day" option but you can set up 2 schedules - one for a specific time in the morning and one for a specific time in the evening.
Also note: You can only create one schedule in the free version of the add-on. To add an unlimited amount of schedules, please upgrade to the PRO version.
Weekly Schedule
You can also create a weekly schedule:

Here you can decide on which day or days of the week the schedule should sent your emails like
- only on Monday,
- Monday and Tuesday,
- Monday to Friday (Weekday),
- Saturday and Sunday (Weekend)
- etc.
Also choose the time your schedule should work like between 8am and 9am.
As a more advanced option, you can instruct the schedule to send your emails every second (bi-weekly), third, fourth, etc. day with the "Repeat every" setting.
You can also select a start and end date for your daily schedules.
Please note: The repeat as well as start and end date setting is only available in the PRO version of the add-on.
Weekday Schedule
For a weekday schedule, simply create a weekly schedule and select Mo-Fr:
- Send Emails: Weekly
- Repeat every: 1 week
- Repeat on: Monday, Tuesday, Wednesday, Thursday, Friday
- Between: e.g. 8am-9am

This makes the addon much more flexible than adding a static weekday-schedule because if your week is running from Tu-Sa you can simply select Tu-Sa and get the result you need.
Weekend Schedule
For a weekend schedule, simply create a weekly schedule and select Sa and Su:
- Send Emails: Weekly
- Repeat every: 1 week
- Repeat on: Saturday, Sunday
- Between: e.g. 8am-9am

This makes the addon much more flexible than adding a static weekend-schedule.
Bi-Weekly Schedules
If you like to setup a bi-weekly schedule, just increase the "repeat every" setting to two weeks instead of one week:

Note: With this you can even setup a schedule in three-week, four-week, five-week, six-week, etc. period.
Also note: This does not only work for weekly schedules but for all schedules like bi-hourly, bi-daily, bi-monthly, quaterly etc.
This advanced schedule configuration is available in the PRO version of the Add-on:

With the monthly schedule you can decide on which day and time your emails will be sent.
As a more advanced option, you can instruct the schedule to send your emails every second (bi-monthly), third, fourth, etc. day with the "Repeat every" setting.
You can also select a start and end date for your daily schedules.
Please note: The repeat as well as the start and end date setting is only available in the PRO version of the add-on.
Quaterly Schedule
With the monthly schedule you can even create a quaterly schedule.
To do so add a new monthly schedule and set the repeat-setting to "every 3 months":


With the annually schedule you can decide on which date and time your emails will be sent.
Start Date and Time
Moreover you can select a start date and time for all schedules:

With this you can instruct your schedules to start at a specific date and your emails will be sent on a specific time.
Note: By default (and in the free add-on version) the start date is today.
This advanced schedule configuration is available in the PRO version of the Add-on:

With this you can instruct your schedules to end
- never (runs forever until you stop your schedule),
- on a specific date,
- after e.g. 13 occurences.
This advanced schedule configuration is available in the PRO version of the Add-on:
Save and go on
After you configured your schedule, save your settings.
You come now back in the Schedules Settings overview where you get an wounderful summary about your schedule configurations:

Note: You can only create one schedule in the free version of the add-on. To add an unlimited amount of schedules, please upgrade to the PRO version.
Next to each schedule you have a burger menue. Click here to edit, duplicate or delete your schedule:

After you have created all your desired schedules, click again an "Save".
You now get a summary about your schedule configuration in the overview:
How to: Enable your Schedule
You can start scheduling your emails by clicking the “Enable Schedule” button:

You will be noticed that scheduling is enabled via a green bar at the top of the add-on:

Moreover the icon next to your schedule name changes from ⛔ to ✅.
How to: Disable your Schedule
To disable scheduling for one specific person, delete this person from the email address field: Save and schedule your settings again.

To disable scheduling for all people, click on the “Disable Schedule” button in the overview:

The icon next to your schedule name changes from ✅ to ⛔.
You can also disable scheduling for all people directly in the configuration by clicking on Edit --> Disable Schedule:


Done.
Fantastic - you are done!
Now lean back and let the add-on do your work. ☕
But hang on...
Let me shortly tell you about the PRO version of the Schedule & Send Email add-on:
PRO FEATURES
The PRO version covers 7+ advanced features and PRO support.
Get an feature overview here and more details below:
- Multiple Configurations: Send reports to different people at different times.
- Unlimited Schedules: Setup as many schedules as you like.
- Advanced Schedule Configurations: start date, end date, bi-weekly schedules.
- File Merger: Merge all sheets to one file fir exporting.
- Dynamic Values: for filenames and in emails.
- Super Advanced Settings: like skip refreshing data or delay after refreshing.
- Premium Support: I will answer every emails within 48 hours.
- 14 Days Money-back Guarantee
Further PRO features coming soon: Have a look on my roadmap.
Upgrade to PRO and get immediatelly access to all PRO features.

[PRO] Multiple Configurations
The most important benefit of the PRO version are multiple configurations.
Get a quick overview via the following Youtube Video:
With multiple configurations you can send different sheets with different settings to different recipients:

Why is that important?
An example: Your marketing department needs to have a daily report with marketing KPIs. They wish to get an Excel file which is sent to their email inbox. Your marketing manager needs to get the same report but instead of an Excel file as PDF. And your CEO also needs to see the marketing KPIs but only once a month.
With the basic version of the add-on you can only setup ONE configuration for example for the marketing department: A daily XLSX report.
But you need two more configurations: For your marketing manager and your CEO.
The solution: With the PRO version you can simply setup your three different configurations. ✅
Your benefits:
- Create multiple configurations for different audiences.
- Enable all schedules at once.
- Disable all schedules at once.
[PRO] Unlimited Schedules
In the free version you can set up a one schedule in the schedule settings interface:

With PRO you can set as many schedules as you need without any limits. ✅
Get a quick overview via the following Youtube Video:
[PRO] Advanced Schedule Configurations
Furthermore you have more schedule configurations available in PRO:
- Start date and time
- End date
- Never
- On a specific date
- After X occurences
- Repeat Schedules all
- two (bi-hourly), three, four, etc. hours
- two (bi-daily), three, four, etc. days
- two (bi-weekly), three, four, etc. weeks
- two (bi-monthly), three, four, etc. month
[PRO] File Merger
In the free version you can only send each sheet of your Spreadsheet as a single file.
With PRO you can merge all your sheets to one file. ✅
That's not only convenient, it also helps you work around a Googles limit: Google allows to send only 5 to 6 sheets at once whereas all others get damaged.
To avoid getting your files damaged, send them all in one file with the PDF merger.
Get a quick overview via the following Youtube Video:
[PRO] Advanced PRO Settings
To make this add-on as usable and convenient for everybody I also include features for very special and sometimes very unique cases like:
- Skip refreshing data
- Delay after refreshing
- Insert or exclude reference footer in every email

[PRO] Premium Support
I build this add-on to save time and reduce work complexity.
That's why it is important to me that you get your things done.
With the PRO version of my add-on you get PRO support on top. ✅
So if you have a question that keeps you awake, do get in touch with me.
I will answer your questions within 48 hours - and I do keep my words!
But don't take my word for it - see for yourself and the great feedback in GSuite Marketplace:

Let's put the cards on the table:
PRO costs you
- ONLY $47 per year or
$149 for a lifetime license.
I also give you a 14-days money back guarantee. So if you are not satisfied with the functionality during testing, just write me an email and I will refund your money.
Of course! You should not pay for something which doesn’t work for you because I also will not pay for something which does not work for me!
That's why: GET STARTING NOW with absolutely no risk!
Rating & Feedback
If you have any questions, feel free to have a look in my comprehensive FAQ section. Here you find a lot of Q&As from other users as well as use cases, further ideas as well as valuable hints.
Also have a look in my release notes if you are searching for a specific feature. In the release notes I continously update new and available features and also include my TODO list with upcoming features.
Finally if you have any wishes, ideas, use cases, etc. which are not yet possible with my add-on yet, you can always send me an email via my contact form.
>> Now it’s time to get started.
Over 65.000+ users in 120+ countries are already convinced: Try the Schedule & Send Email add-on for Google Sheets now!
I wish you a lot of time saving and work simplification with my Add-On.
Regards, Michaela
